How to build a raised deck

A step by step guide on how to build your own raised decking area.
Raised decking doesn't have to be attached to your house; it can be used as a centrepiece in your garden such as around a tree, as a shaded area, or to provide a suitable position for a hot tub. Raised decking provides an attractive external entertaining space.
Step 1- Planning and Preparing your decking area
1. Leaves, rocks, and other debris should be removed from the chosen location for your decking to be built.
2. Use pegs and a string line to measure and mark out the decking area’s size and design.
3. If you are not attaching the decking to a building, move onto step 3.

Step 2- Attaching a deck to a building
1. When attaching decking to a building, one joist must be installed directly against the wall of the building, and the remainder of the sub-frame must be aligned with it. Mark out where you are attaching the joist to the wall and check that it won’t interfere with the dampproof course or obstruct air bricks.
2. Pre-drill holes along the length of the joist before attaching it. It is recommended to alternate between drilling one hole at the top and one hole at the bottom of each joist, 400 mm apart. The holes must not be too close to the edge of the joist, as this will weaken it.
3. When drilling the holes, ensure that the bolts will be attached to the brickwork rather than the mortar.
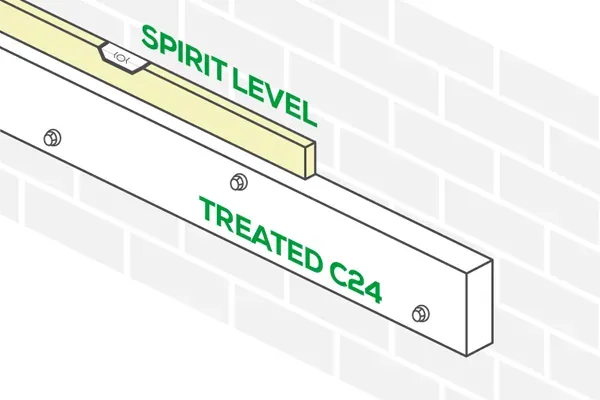
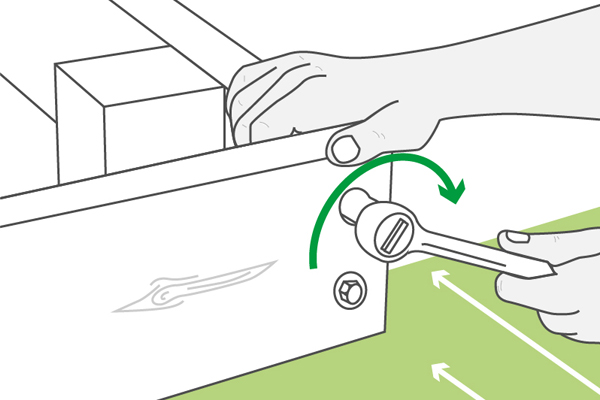
4. Using a flat wood drill-bit attachment, drill recesses into the joist. The recesses (also known as countersunk holes) must be deep enough for the nut, plus a spanner to comfortably tighten or loosen them.
Place the joistagainst the wall and check it is straight using a spirit level. To indicate where you need to hang the joist, make a mark on the brickwork through each hole.
5. Remove the joist and drill into the brick at the marked points using your drill’s hammer action.
6. To allow water to run down the wall instead of accumulating on the decking, leave a slight gap between the timber joist and the wall. You can use stainless-steel washers as spacers to create a 10mm gap.
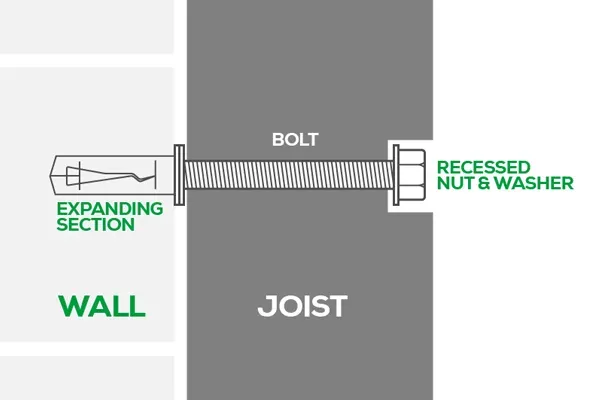
7. Place the spacer between the joist and the wall by inserting expanding masonry bolts into each hole, and tighten them with a socket spanner.
Step 3- Creating joist support
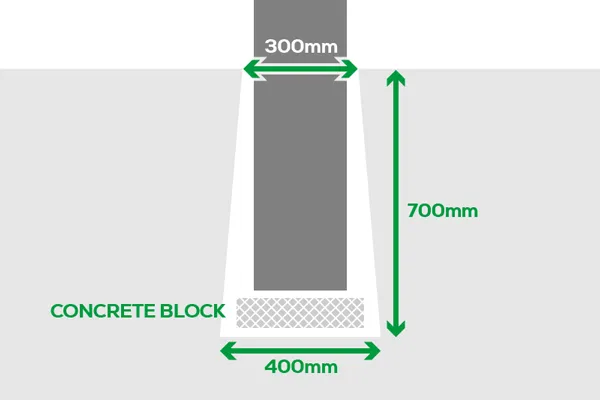
1. In each of the corners you've set out for your decking, dig 700mm deep holes. At the bottom, the holes should ideally be 400mm wide, and at the top, they should ideally be 300mm wide.
2. For extra stability, add a concrete block to the bottom of each of the holes, putting it firmly in place. Then place a post in the hole, make sure that it is longer than you need so you can cut it down to size later.
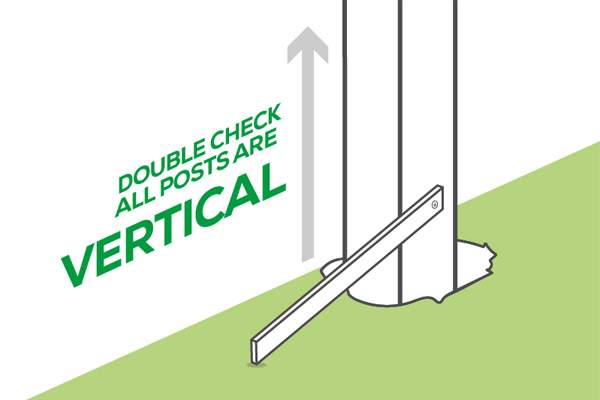
3. Support the posts by screwing pieces of timber batten to them until you're ready to postcrete. Double-check that the posts are vertical, and complete this for each corner.
4. Find the middle point between the corner posts and hammer in a timber batten. Repeat until you have new postmarks in position. It is recommended to place them no more than 1500mm apart.

5. Ensure each post is vertical before securing it with postcrete. Make a slope in the postcrete with a trowel, this allows rainfall to drain away from the post on all sides. Allow it time to set according to the manufacturer's instructions.
6. Remove the lines, profiles, and wooden props once all of the posts are in place and the concrete has set or hardened.
7. Lay down a sheet of weed-control fabric, ensuring that it is cut to fit around the posts, then cover it with gravel to aid drainage.
Step 4- Building the joist sub-frame for your deck
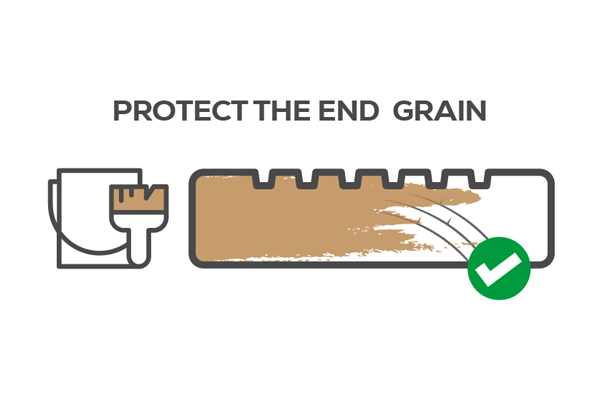
1. Remember to account for overlapping corner joints while cutting the sub-outer frame's joists to length. Apply an end grain preservative to the cut ends using a brush. Use metal joist hangers and 50mm galvanised nails to secure the sub-frame joists to the wall joist. Pre-drill the holes for the galvanised nails to avoid the timber splitting. There are multiple ways of fitting the subframe to the building, for example another way is to build the whole frame, lift it into position (with assistance), and then bolt it to the wall.

2. If you’re not attaching the decking to the wall, install the joists to all the corner posts following the point above.
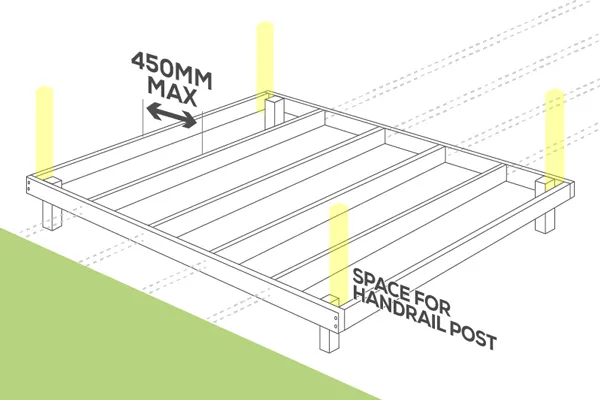
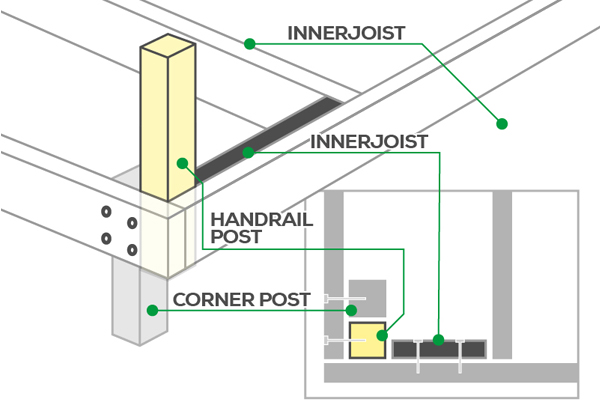
3.Before affixing the joist, use a spirit level to check that it is level. Match the outside of the corner posts to the side joists. To ensure that a railing post can be secured within the frame, the ends should extend out by the width of a decking post.
4. To make a recess for the screw heads, drill holes through the joist into the post and countersink the heads with a flat wood drill bit. Using a socket set with a ratchet handle, attach two coach screws.
5. Drill a second countersunk hole and use two more coach screws to connect the outer joists' corners. Two joists, as well as the supports and, if applicable, the wall, should now be fastened to each other.
6. Continue around the decking, using two countersunk coach screws to secure the joists to each post.
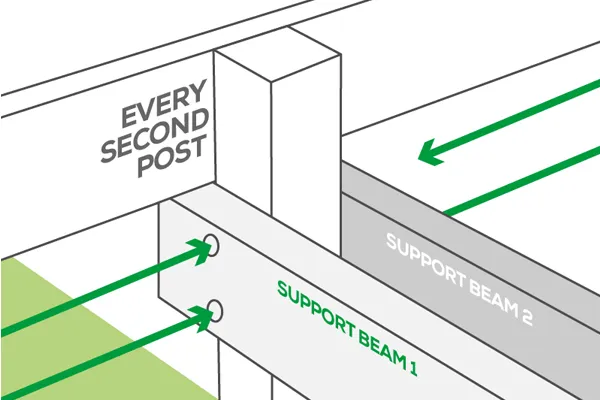
7. Screw two support beams onto every second post along the length of the decking. To add further strength to the sub-frame, place a support beam just beneath the joists of the sub-frame.
8. Cut the inner joists to size and secure them to the frame with two countersunk coach screws at each end. If your decking is attached to a wall, use joist hangers.
9. The centre of two inner joists should be no more than 450mm apart for a horizontal layout. The joists on diagonal boards must be spaced no more than 300mm apart.
Step 5- Building a balustrade to a raised deck
1. First, determine the height of your railings. If you have young children, ensure the railings are tall enough to prevent them from climbing over. Remember to provide enough space for the decking boards beneath the base rail.
2. Decide how you want to space out the decking posts, then cut the base and handrails to the length that suits your decking design.
3. Drill pilot holes 100mm apart through a length of the base while rail clamped on a workbench.
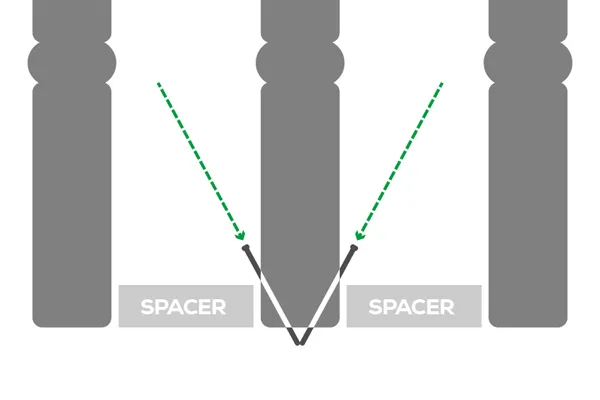
4. Secure the spindles to the underside of the handrail by screwing diagonally through the spindle and into the rail. Use a spacer produced from a wood off-cut to accurately measure the intervals, as indicated below. It is important to remember that the slotted sides of both rails should be installed pointing downwards (grooved underside) to prevent rainwater from collecting in them.
5. Drill pilot holes in the bottom of each spindle. Attach the spindle to the base rail with 50mm deck screws.
6. Use a quick-release clamp to secure a decking post in the gap between the joist support post and the corner of the sub-frame. Use two countersunk coach screws to secure the post to the sub-frame.
7. Place a piece of joist offcut between the corner post and the inner joist to make the post you just put more secure. If you use decking screws to secure it in place it will prevent the post from moving.
8. Place the second decking post in another corner and secure it with one screw for the time being.
9. Use masking tape to mark a 12mm drill bit at 38mm from the tip. Then, on each end of both the hand and base rails, drill two holes to that depth.
10. Place 12mm wooden dowels in the initial holes and mark the top and bottom positions on the adjoining post, then make 38mm holes at each marked point with your drill.
11. Slot the handrail into place and glue the wooden dowels into the post holes. Place the post and rail in place with a clamp and wait for the glue to dry. Fix the second post in place with a coach screw at the base.
Step 6- How to lay deck boards on a raised deck
1. Start at the outer edge of the sub-frame and move inwards, the boards must be installed in the opposite direction of the joists.
2. Cut the board to size and fasten it in place in front of the decking posts, overhanging the sub-frame. Then trace the decking post's outline onto the decking board using a combination square or builder’s square.
3. Using a jigsaw, cut out the shape of the decking posts. Apply an end grain protection to the exposed cut end.
4. The cut decking board should slot into place. Plane or cut down its outer length if necessary to ensure that the inner edge is flush with the decking posts inside edge. This will provide you with a straight edge to work with while laying the rest of your decking boards.
5. Starting at one corner of your sub-frame, lay the first board across the inner joists, running in the opposite direction as the inner joists. The board must be flush against the frame.
6. Mark the location of the screws with a pencil. To fasten the board to each joist it crosses, use two screws on each side of the board. Screws should be at least 15mm from the board's end and at least 20mm from the board outside edges.
7. Drill a pilot hole through your pencil marks to guide the screws, but don't drill all the way through to the joist. Use a drill bit that is smaller than the shank of the screw. As decking screws are designed to sit flush with the board, you don’t need to drill a countersunk hole.
8. Insert the screws into the board and tighten them. Repeat the technique with the second row, leaving an expansion gap between the boards. It is essential to stagger the boards to make your decking as robust as possible, so you may need to trim a couple to make this achievable.
9. After you've finished building your decking and installed all of the boards, sand down all of the cut ends with sandpaper and seal them with an end-grain preservative.
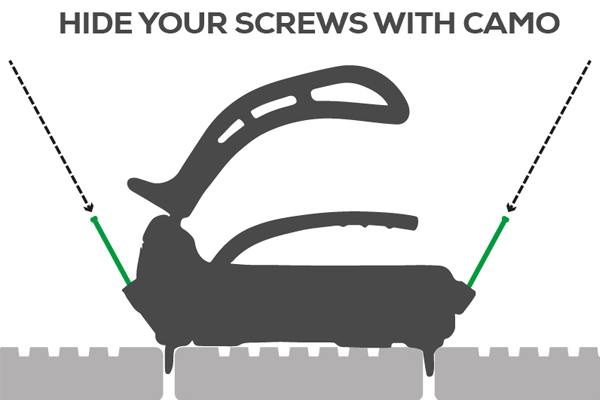
Using the decking Camo system
1. If you use the handy Camo
Camo tool sits on top of the board and sets the expansion gap between the boards for you.
2. You then simply drop the specially designed screws into the angled guide holes on the tool and screw them into place. The screws are designed to pull themselves into the decking so only light pressure is needed. The screws are hidden on the edge of the decking board, not on the face, giving the decking a much cleaner finish with no visible screws. If required, the screws can be easily accessed and removed at any time in the future.
3. The Camo system can be used with treated wood, hardwood, cedar PVC and composite decking.
Step 7- Adding deck steps
1. In the interest of safety, try to use anti-slip decking boards for steps, or any areas around or leading to steps. Step kits are the quickest and most convenient way to install steps. You can buy them in three, four, and six-step set kits, but if you would like more steps, you can assemble them yourself instead of using a kit.
2. Your stairs must be placed on solid ground to prevent them from sinking or breaking. Create a small concrete space or place paving slabs underneath the bottom step if the earth alone isn't firm enough.
3. Use two countersunk coach screws on each side, to attach two joist offcuts the same width as the step treads, to the step riser at the top and bottom.
4. Place the stairs against the decking frame, ensuring that they are in the centre of the support pad or firm section of ground. The longest edge should be against the decking and the shortest against the paving slab.
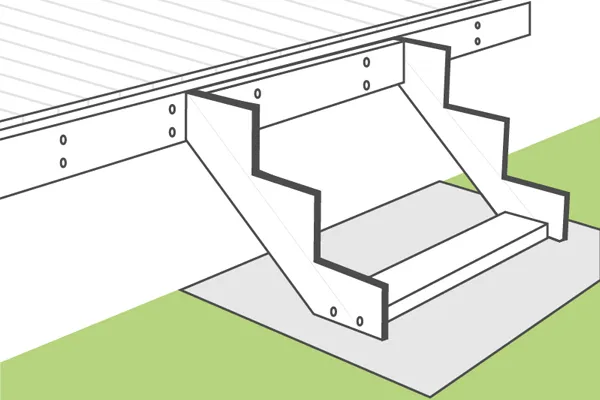
5. Drill pilot holes in the sub-frame joist and the step frame. With four countersunk coach screws, fasten the step frame to the decking.
6. Drill pilot holes in the riser on both ends and secure the treads with two 50mm deck screws. For each step, repeat this process.
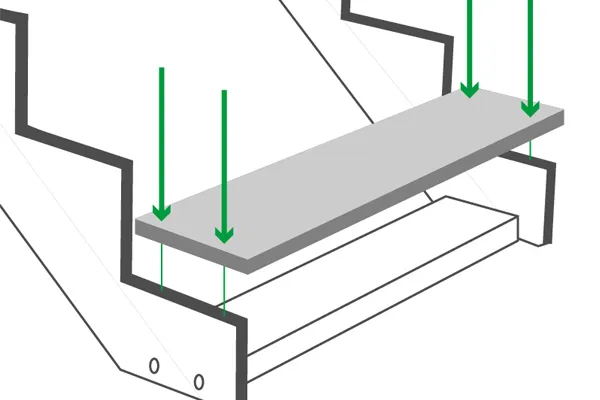
7. Alternatively, if you want a solid stair set instead of having open gaps between each step, cut down joist / decking board offcuts to size, and attach them into the step riser with two screws on either end.
Step 8- Fitting the handrail to steps
1. To install handrails on your steps, install notched decking posts at the top and bottom. Decking posts that have been notched (or rebated) have had a piece of the post removed.
2. Score the post with a jigsaw and remove that section with a chisel. If you remove more than half of the post, the structural integrity will be considerably weakened, and it may easily break.
3. Sand down rough edges with sandpaper and apply Ronseal Deck End Grain Protectorto the exposed edge.
4. Insert two coach bolts into the step riser through each notched post. Then attach a handrail to the exterior of the posts, ensuring that it is parallel to the stairs direction.
5. Mark the outer edges of the posts with a pencil and cut along this line with a jigsaw. Attach the handrail to the posts ensuring the edges are flush.
6. If you wish to attach spindles, affix them to a base rail in the same way you would a handrail. Then trim them to length and screw them in place.
After you have finished building your decking, you will need to protect it from the sun and rain. Check out our maintenance blog to find out how to look after your decking.
Recent Posts
-
Low maintenance garden ideas in time for summer
When the warmer months arrive, there’s nothing better than enjoying your garden without the constant
-
The Ultimate Guide to Sheet Materials
When it comes to building materials, sheet materials are a staple on site. From flooring to roofing