How to build a raised garden bed with sleepers

Incorporating raised beds in the garden is one of the easiest and most effective ways to transform your outdoor space. Whether you're growing vegetables, herbs, or flowers, a raised garden bed offers enhanced drainage, improved soil conditions, and easier access for planting and maintenance.
If you’re wondering how to make a raised garden bed with sleepers or even how to make a raised garden bed with railway sleepers, this step-by-step guide will walk you through everything you need to know to build practical, long-lasting, and affordable timber raised garden beds.
Why use raised beds for a garden?
Raised beds for garden use allow you to control your soil quality, reduce weed growth, and extend your growing season. Many gardeners opt for a raised bed garden bed because it creates structure in the landscape while making garden care more manageable. With the right approach, you can even build a bed that suits your space, budget, and level of experience.
How to Build a Raised Garden Bed with Sleepers
1. Choose your sleeper size
For a durable structure, we recommend using treated timber sleepers. Good sizes include:
-
95mm x 195mm
-
120mm x 240mm
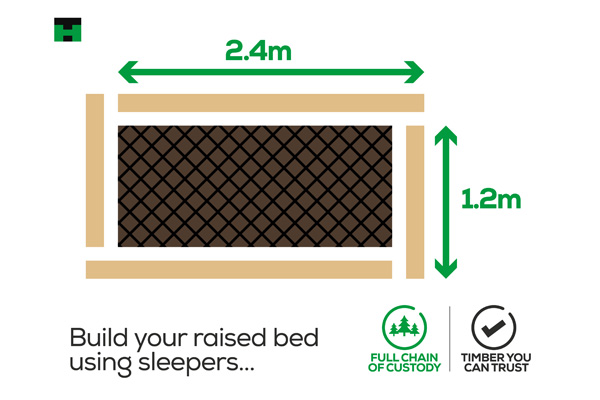
To create a standard rectangular garden raised planting bed, you’ll need four sleepers for the base layer: two full-length sleepers (2.4m) and two cut in half (1.2m). These can often be purchased pre-cut to make assembly easier.
2. Prepare the ground
Position your sleepers on a flat, level surface. For optimal drainage, lay a weed-suppressant membrane topped with 20mm gravel before positioning your sleepers. This not only protects plant roots but also limits unwanted weed growth from below.
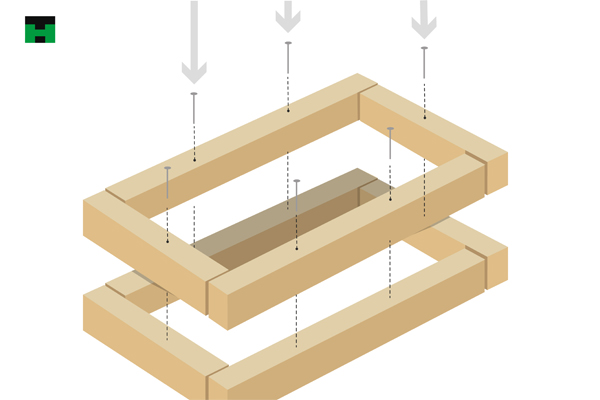
3. Lay and assemble the base
Form a rectangle with the sleepers by placing them on their narrowest edge. Use Spax 8x200mm screws (two per corner) to secure the pieces together. Ensure at least 105mm of each screw penetrates the adjoining sleeper for a sturdy hold. Alternatively, galvanised L brackets can be used for internal support.
Once fastened, you’ll have a sturdy frame raised approximately 200mm (7.87 inches) off the ground.

4. Add additional layers
If you want more height, you can stack another layer of sleepers. Overlap the joints, much like brickwork, for stability and a neater appearance. Fix each sleeper through the top layer and into the one below using 200mm timber screws or internal brackets.
5. Securing each layer
Repeat the process for each additional layer, ensuring all sleepers are securely attached. Most raised beds for a gardens are 300–600mm high (roughly 12–24 inches), depending on your needs. A height of at least 150mm (6 inches) is sufficient for most planting.
6. Fill and finish
Once your bed is built, you can begin filling it with your chosen soil. For improved drainage, you can line the bottom with bricks, stones, or coarse gravel before adding soil. Consider using a breathable liner to retain soil while allowing water and beneficial insects to move freely.
For extra durability, treat your timber with decking or exterior wood oil twice a year—ideally in Spring and Autumn. You can also customise your raised beds in the garden with paint or stains for a personalised touch.

Product shopping list for a two-layer raised bed:
-
6 x Treated timber sleepers (4 full-size, 2 halved)
-
24 x 200mm timber screws
-
90° internal corner brackets (optional)
-
Drill and screwdriver
-
Weed-suppressant membrane
-
20mm gravel
Timber safety and quality
All our sleepers are treated to a User Class 3u standard, suitable for external, above-ground use. We’re also introducing Kiln-Dried Redwood sleepers treated to UC4—perfect for ground contact.
Always wear gloves and eye protection when working with treated timber, especially when cutting or drilling.
Howarth are developing a range of Kiln Dried Redwood sleepers which will be chemically treated to a UC4 standard, meaning they are suitable for use in ground contact. All Howarth chemical treated timber meets the strict UK & Euro Biocide Product Regulations Standards. However, care must still be taken. Ensure that gloves are worn when handling and eye protection is worn when cutting or drilling timber.
Creating your own raised garden bed is simple, cost-effective, and incredibly rewarding. Whether you're using the guide to explore how to build a raised garden bed with sleepers or how to make a raised garden bed with railway sleepers, the process is the same—and the benefits are long-lasting.
From improved drainage to better soil conditions, raised beds for garden growing are a brilliant way to elevate your outdoor space. And with so many configurations possible, you can design raised beds for a garden that truly fit your needs.
If you have any more questions concerning how to build a raised bed with garden sleepers, or need any additional information about the sleepers we sell at Howarth, please visit your local Howarth branch, or contact our customer services on 01472 907051.
You can also explore our range of sleeper products here, or you can even visit us in branch for more information.
Recent Posts
-
How to stop block paving sinking
If you’ve noticed dips, uneven surfaces, or pooling water, you’re not alone. Block paving sinking is
-

5 Decking Ideas for Small Gardens
If you’re looking for decking ideas for small gardens, there’s an array of ways to maximise your spa
