How To Fit Railway Sleepers Together

Sleepers for gardens (also known as large sized landscape timbers or railway sleepers) are an incredibly versatile timber product, ideal for landscaping, furniture, and general construction projects. They come in various sizes in both new and reclaimed, softwood or hardwood. Reclaimed sleepers were originally purposed to support railway lines; they have a rugged appearance which creates a rustic look for your garden. Sleepers are incredibly popular due to their adaptability to any style or function of garden.
Tool kit for your garden project:
- Drill
- Saw (sleepers are thick, so a good saw is important)
- Long screws
- Paint (if desired).
- PPE (gloves, goggles) - safety should always come first.
- Sleepers
Firstly, decide which type of timber and screws you would like to use.
Oak Sleepers
Oak sleepers are more naturally durable than softwood sleepers and have no chemical preservatives impregnated into the timber. This makes it a truly clean, fresh and natural product.
If you would like to add an extra level of protection to your oak sleepers, UV resistant varnish will increase its waterproofing and enhance its attractive appearance.
Softwood sleepers
Softwood sleepers are manufactured from a variety of sitka spruce, pine, hemlock and fir. To enhance the natural lifespan of these products they are treated to resist decay and insect attack. The treatment does lead to a colour change, this is to be expected, and appears as a washed-out green colour.
Landscaping Screw
When fixing railway sleepers together, use steel landscaping screws as they are strong, won’t corrode if they come into contact with timber treatment, and are available up to 250mm in length. With a hexagonal head they can be put in place using a power drill. These will screw through one sleeper and into the next, holding them together.
You do not have to worry about them coming loose as they require an extremely high force before they pull out as they make a strong joint. To remove, it is best to use a drill to unscrew the screw.
TimberLok Screw
An alternative to using a landscaping screw is to use a TimberLok screw. These have a clear 'anti-friction topcoat' which allows the screw to penetrate even the hardest wood more easily than other screws. They install faster than coach screws or bolts, and do not require drilling, with a countersunk finish. These screws tighten up so powerfully, that they lock the railway sleepers together, this can make it harder to remove if required, therefore make sure that everything is correctly in position.
Step 1 on How to fit railway sleepers together
Place the railway sleepers on the ground either on their narrow edge (as seen in the photo below) or on their wider edge. If possible, lay the sleepers on a shallow gravel bed to aid drainage away from the timber.
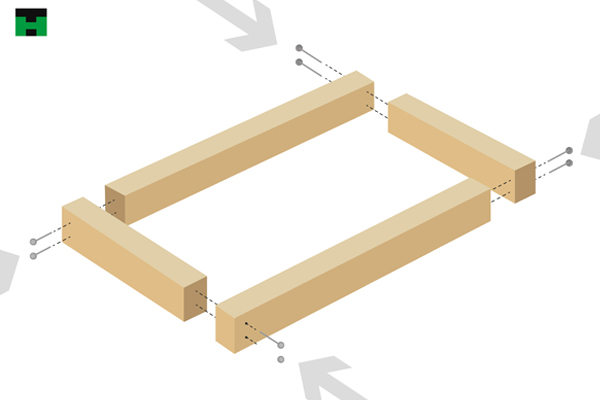
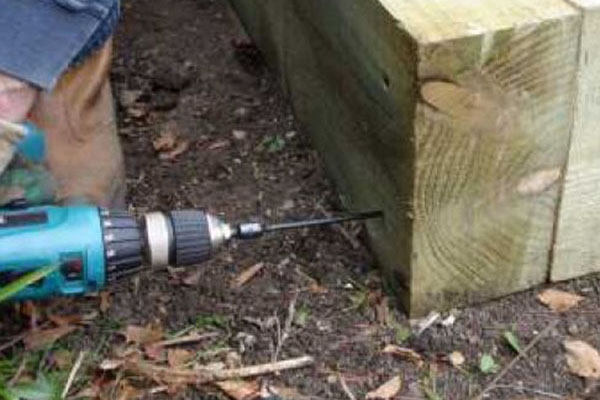
Step 2 - screw sleepers togethers
With sleepers on a narrow edge, simply screw the sleepers together at the 90 degree corners, allowing at least 50mm (or 2") of the screw to penetrate the adjoining sleeper. Two screws per corner is ideal.
Alternatively, you can utilise 90 degree L-Shaped Brackets in each corner to hold the sleepers together and perfectly in place.
If you have placed the railway sleepers on the ground on their wider edge, then again simply screw them together at the 90 degree corners, allowing at least 50mm (or 2") of the screw to go into the adjoining sleeper. You will need to screw through more of the railway sleeper than on the narrow edge option.
Step 3 - adding layers
To add a second layer, place your sleepers on top of the first layer, overlapping the joints. Simply screw through the second layer into the first layer below.
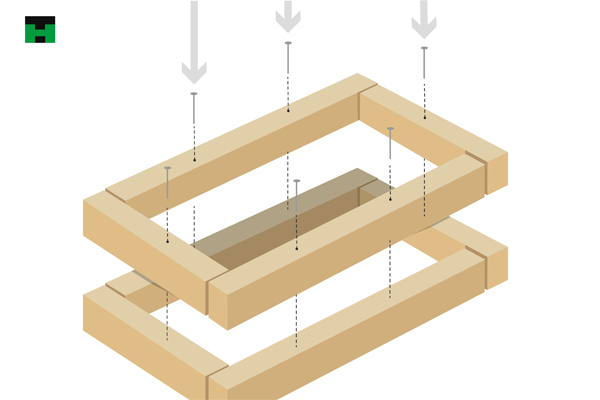
Repeat for additional layers. Again, at least two screws per sleeper end is a good solid formula.
Step 4 - protect your garden sleepers
For enhanced protection, you may wish to line the structure sides (not the base) with a waterproof plastic. This will sit between the timber and the contents of your raised sleeper bed.
Recent Posts
-
An Introduction to Types of Paving
There are so many different types of paving out there, but which ones are right for your project? Wh
-
10 small outdoor kitchen ideas just in time for summer
As summer approaches, many homeowners are looking for ways to enhance their outdoor living spaces&md