How To Fit Railway Sleepers Together

Railway sleepers (also known as landscape timbers or garden sleepers) are one of the most versatile materials you can use in your outdoor projects. Whether you're building railway sleeper flower beds, creating rustic railway sleeper steps, or designing eye-catching railway sleepers for garden edging, sleepers bring both function and charm to any outdoor space.
From reclaimed, weathered sleepers with a rustic appeal to freshly cut oak and softwood options, there's a perfect choice for every garden design. In this guide, we’ll walk you through how to use garden railway sleepers, what tools you’ll need, and the best methods for building long-lasting outdoor features.
Why use garden railway sleepers?
Railway sleepers in gardens are increasingly popular, and for good reason. Originally used to support train tracks, these large timber beams now make an appearance in everything from raised beds and garden edging to outdoor furniture and retaining walls.
They’re available in different finishes, sizes, and wood types — including oak sleepers and treated softwood sleepers — making them adaptable for almost any project.
Key Benefits:
-
Strong, durable, and long-lasting
-
Easy to cut and shape
-
Great for DIY landscaping projects
-
Blend beautifully with both modern and rustic garden styles
What size are railway sleepers?
One of the first things to check before starting your project is railway sleeper size. While dimensions can vary, the most common size is 2400mm x 200mm x 100mm — ideal for building raised beds, retaining walls or steps.
Whether you're working with new or reclaimed wood, make sure your sleeper size is appropriate for the job — especially if you're layering or stacking.
Tool kit for your sleeper project
Before you begin, gather the following tools and materials:
-
Drill (powerful enough for thick timber)
-
Saw (a circular or chainsaw works best)
-
Landscaping screws or TimberLok screws
-
PPE – gloves, goggles, and suitable footwear
-
Paint or wood stain (optional for finishing)
-
Waterproof plastic liner (for raised beds)
- Sleepers (of course!)
Choosing the right sleepers for the job
Oak Sleepers
Oak sleepers are dense, naturally durable, and chemical-free. They’re perfect for high-end finishes like garden furniture, steps, or flower beds. To protect them further, apply a UV-resistant varnish.
Softwood Sleepers
Manufactured from pine, fir, or spruce, these are typically pressure-treated to resist rot and insects. You’ll notice a greenish tint from the treatment — a natural part of the process.
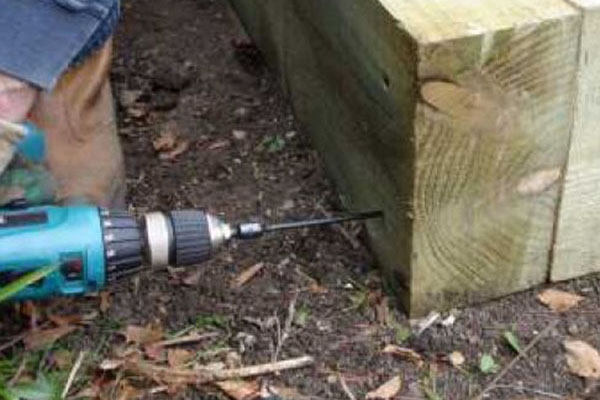
The best screws and brackets
Landscaping Screws
Designed for heavy-duty projects, these screws are corrosion-resistant and up to 250mm in length. Use a hex-head and power drill to drive them through one sleeper into the next. They’re ideal for projects like railway sleeper steps or retaining walls.
TimberLok Screws
These high-strength screws require no pre-drilling, making installation faster. They're excellent for locking sleepers tightly in place but can be harder to remove, so position them carefully.
Railway Sleeper Brackets
For added stability, especially at corners, use railway sleeper brackets like L-shaped or flat joining plates. These help keep the structure square and secure.
How to Fit Railway Sleepers Together
Step 1: Lay the First Layer
Position your sleepers on their narrow edge or wider edge, depending on your desired look. For better drainage, lay them on a shallow gravel bed.
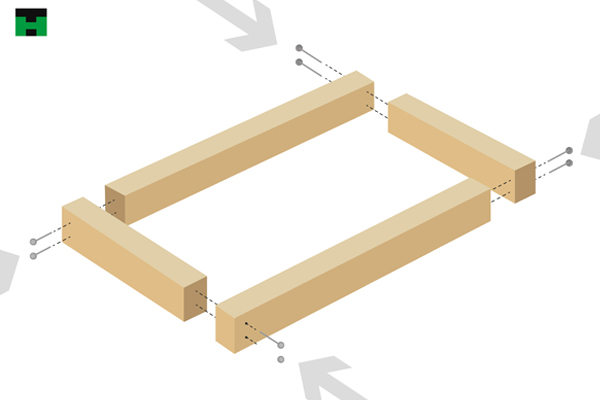
Step 2: Secure the Corners
Screw the sleepers together at 90-degree corners. Ensure at least 50mm of the screw penetrates the adjoining timber. Use railway sleeper brackets at the joints for added support and to keep edges neat.
If you have placed the railway sleepers on the ground on their wider edge, then again simply screw them together at the 90 degree corners, allowing at least 50mm (or 2") of the screw to go into the adjoining sleeper. You will need to screw through more of the railway sleeper than on the narrow edge option.
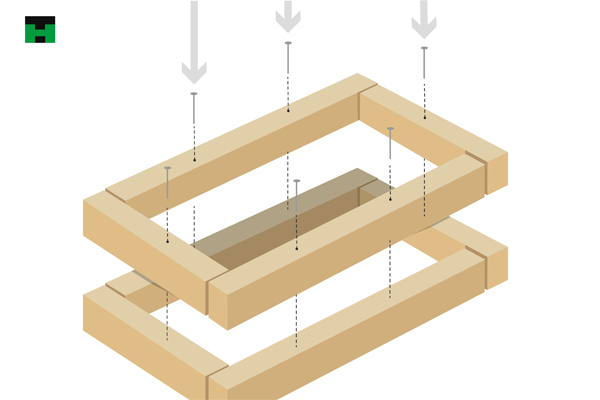
Step 3: Add Layers
To create taller structures like raised beds or retaining walls, stack another layer on top of the first, overlapping the joins. Screw them together from top to bottom, using two screws at each end.
Repeat for additional layers. Again, at least two screws per sleeper end is a good solid formula.
Step 4: Protect Your Structure
If you're building a railway sleeper flower bed, line the inner sides (not the base) with waterproof plastic to prevent soil moisture from damaging the wood. For edging or steps, apply a weather-resistant wood treatment if needed.
Overall, we hope this article has helped you understand more about how to fit railway sleepers, however, if you have any more questions about sleepers, or would just like to know more about the products we sell at Howarth, we offer helpful advice from our Customer Service team who may be able to advise you further, and you can contact them on the number 01472 907051.
You can also explore our range of sleeper products here, or you can even visit us in branch for more information.
Recent Posts
-

How To Fit Railway Sleepers Together
Railway sleepers (also known as landscape timbers or garden sleepers) are one of the most versatile
-
An Introduction to Types of Paving
There are so many different types of paving out there, but which ones are right for your project? Wh
